Definitive Guide for Creating Carousel in React.

I am a beginner UI Designer, an Intermediate Web Developer and an Expert Learner. Looking to make my career creating new Web Applications from scratch, and sharing all that I have learnt, by writing technical articles to help them, Get Started!
Introduction
Hello everyone! I'm back with another article, on designing Carousel in ReactJs from scratch, without using any other library! In the end, as a bonus, I'll show you the easiest way of adding Active Class to your Carousel, to make them look even better and improving the UX of your website.
Before starting the actual coding section, let's take a look at the Pre-requisites required.
In the end of the tutorial, you'll be able to create this.
Pre-requisites -
- Basic knowledge of React Function Components.
- Basic use of the 'useState' React Hook.
- Data for your Carousel.
If you feel like you don't know any of the above topics, you can take a detour and read about them here.
Without further ado, let's begin -
Step 1 -
For this tutorial, we'll be using CodeSandbox for working in React. Alternatively, you can use your desired code editor and install your React packages, using
npx create-react-app myapp.
Let us begin by creating a React Sandbox. Remove all the code between the parent div tags (with the className = "App"). And Also the code already present in the 'styles.css' file, as we will be styling it on our own.
Also let's add some initial styling to our css file, so as to remove any pre-defined styling such as margin, padding etc.
*{
  padding: 0;
  margin : 0;
  box-sizing: border-box;
}
Now Let's start by creating an Object containing Array of Objects (or a 'json object'), that will contain all the information, to be displayed.
Step 2 -
For creating our json file, we can create it in the same file, i.e. 'App.js' or we can create another .js file, and import it in our App.js file. The latter, helps us create a clean & readable code, so we'll use it here. Feel free to use whichever method you like!
So let's create a new file, in the same folder and lets Name it 'Database.js'.
We'll have 4 different objects with keys as 'image', 'title' and 'Description'. The dummy data I have used can be seen below -
export const Database = {
  one : [
    {
      image: "../images/1.png",
      Title: "Title 1",
      Desc: "This is your description 1."
    }
  ],
  two : [
    {
      image: "../images/2.png",
      Title: "Title 2",
      Desc: "This is your description 2."
    }
  ],
  three : [
      {
    image: "../images/3.png",
    Title: "Title 3",
    Desc: "This is your description 3."
    }
  ]
};
Note - I have linked sample images from pixabay. And imported these images in my Sandbox.
Finally, lets import our database in our App.js file, using -
import {Database} from './Databse';
Step 3 -
Let's get the keys of the our json Object, so that we can keep count of the number of objects and then accordingly make the carousels. (It might sound overwhelming now, but bear with me, you will understand the point of it in a moment.)
var databseKeys = Object.keys(Database);
Now we will use a map function on these
databaseKeys, which will contain an empty div, which we can style to create small circles for navigation.We will be adding an onClick Handler function inside the div to store the index of the element which is clicked.
Next, we will add a conditional statement inside the
classNameattribute, which will check if the index of clicked element is equal to the current element being viewed, and then accordingly assign theactive-classorunActive-classto it.Inside the clickHandler function, we use a state variable(using useState Hook) and set it's value to current index, which is passed as an argument. We will also use another state variable, to store the current value at the index of the element, which is clicked.
The selector-div elements is now, as shown below -
    <div className="selector">
          {
              databseKeys.map((title, i) => {
                  return(
                     <div
                        key={i}
                        className = {i === ind ? "circle-active" : "circle"}
                        onClick = {() => clickHandler(title, i)}></div>
                  )
              })
          }
     </div>
The clickHandler function is as shown below -
  const [ind, setInd] = useState(0);
  const [current, setCurrent] = useState("one");

  function clickHandler(title, i){
    setCurrent(title);
    setInd(i);
  }
Note - For Readers, who are doing this on CodeSandbox, the useState hook is automatically imported, when we use it. But if you are using some editor, then use import React, { useState } from "react"; at the top of your App.js file .
Before moving forward with the rest of coding, let's define the selector, circle-active & circle class in our styles.css file.
In order to keep the article focused on the functioning part of carousel, I will not explain the css styling part, But you can understand the basic styling, from the code given below -
.selector {
  display: flex;
  align-items: center;
  justify-content: space-around;
  width: 10%;
  margin: 3rem auto 0;
  padding-bottom: 3rem;
}

.circle {
  background-color: #90928e;
  height: 12px;
  width: 12px;
  border-radius: 50%;
  transition: all 0.3s;
  cursor: pointer;
  border: 2px solid transparent;
}

.circle:hover {
  background-color: #007bff;
}

.circle-active {
  background-color: #007bff;
  border-color: blue;
}
Step 4 -
Now, Using the set index, we will display the actual contents of our array element i.e. image, title, desc.
In Step 3, we used a state variable named
currentand we set it's value to theonClickfunction. Before moving further, Let's understand why and how we will use it.
Let's say, we clicked on the first circle with Index = 0.
Now the value at the index '0' i.e., 'one' will be stored in the
currentvariable, throughsetCurrent(title).Then we can access the value of the key 'one' stored in our
Databaseobject. For example, if we want to access the image key present inside the object, we can simply -
var try = Database[current];
var imageTry = try.image;

// --> output : url of the image
But, we won't be using the above method. For the optimization of code, we will use another map function.
<div className="title-box">
    {Database[current].map((title, index) => {
      return (
        <div key={index} className="one-title">
          <img src={title.image} alt="1" />
          <h3 className="title-Name">{title.Title}</h3>
          <div className="title-desc">{title.Desc}</div>
        </div>
      );
    })}
</div>
And Congratulations, Your functioning is complete!!
If you now click on any of the above carousel, you will see that your content changes too.
Let's quickly style up our content-cards in 'styles.css'. You can add your personal style to your website, or you can copy my design, that I have shown below -
.title-box {
  width: 90%;
  margin: auto;
  color: white;
  line-height: 2rem;
  display: flex;
  justify-content: space-evenly;
}

.one-title:hover {
  box-shadow: 0 4px 8px 0 black;
  background-color: #2c90fa;
}

.one-title {
  text-align: center;
  box-shadow: 0 2px 4px 0px black;
  border-radius: 5px;
  padding: 1rem;
  background-color: #007bff;
  margin: 1rem;
}

.one-title img {
  width: 100px;
}

That's it guys. We have learnt an important UX feature in a Website!!
Check out the live demo here. If you feel you skipped something, you can always check my code here.
Summing up-
Let's quickly revise all the steps, we learnt above -
In Step 1, we created our React App, either by using create-react-app on your desktop, or using React Sandbox on CodeSandbox. We removed the redundant code, present in 'App.js' and 'styles.css'.
In Step 2, we created our own Dataset(json) containing all the links, headings and Descriptions we will use for our Website. Next, we imported the Dataset file using
import { Database } from "./Databse";In Step 3, we accessed the keys of our
Databaseobject, and through map function, we created divs(styled as circles) for our navigation. We used onClick function and 2 state variables, to store the index and value of the element being clicked. We used the index state variable to set the active className.In Step 4, we used the second state variable to display the content of the clicked key.
Lastly, we added basic styling to our card-contents, to make them look presentable and beautiful.
Bonus -
To add more cards-display to view at a time, you can simply add more objects, to your already created Database.js. For example -
one: [
    {
      image:
        "https://cdn.pixabay.com/photo/2016/10/25/18/57/animal-1769728_1280.png",
      Title: "Title 1",
      Desc: "This is your description 1."
    },
// Below is the one added new -
    {
      image:
        "https://cdn.pixabay.com/photo/2015/10/01/19/05/car-967470_1280.png",
      Title: "Title 1.1",
      Desc: "This is your description 11.1."
    }
  ],
And Tada! Your new design would be automatically ready!
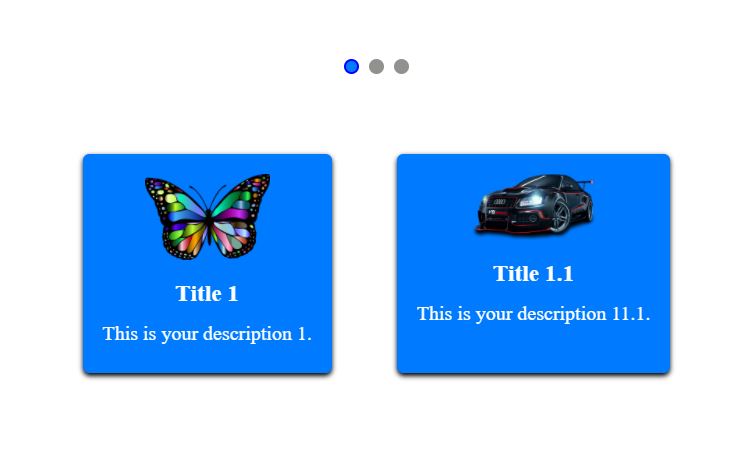
You don't have to change the functionality, every time you have to add a new card. You can just add it in the Dataset and it will be function automatically!!
What's Next?
If you have read my article till here, I'm sure you now have gained the necessary knowledge required, to create Carousels in React. If you found this Article helpful, Drop a Like ❤️ and Share➦ it with your friends to help them too!!
Also if you felt like I missed something, put it into the Comments💬 section, for other people to read.
Stay tuned for more of these amazing blogs! Meanwhile you can check out my other blogs here.
AND HAPPY NEW YEAR GUYS!!


